
Want kid-friendly hairstyles that look cute, last a week, and keep tiny curls safe? Two strand twists do all that without tears or tangles. They’re low-maintenance, playground-proof, and perfect for busy mornings. Ready to try styles that make wash day worth it? Let’s twist and go.
1. Classic Two Strand Twists With Beads

You can’t beat the classic. It keeps hair neat, seals in moisture, and looks super polished with zero fuss. Add beads, cuffs, or colorful bands and suddenly you’ve got a style that makes your kiddo feel like a star.
What You’ll Need
- Moisturizing leave-in and a light twisting butter or gel
- Rat-tail comb for parting and a detangling brush
- Beads, bead tool, and small elastics
- Edge brush and a silk/satin scarf or bonnet
Start on clean, conditioned hair. Part in neat squares or triangles, apply your product, and twist tight enough to seal but not so tight that the scalp looks shiny—no tension headaches, thank you very much.
Tips
- Use smaller twists for longer wear and less frizz.
- Bead the last 1–2 inches, then secure with tiny elastics to prevent slipping.
- Seal ends with a dab of light oil for extra shine.
When to use it? Anytime you need a clean, cute style that lasts 7–10 days with minimal touch-ups. It’s a school-week lifesaver.
2. Chunky Twists With Zigzag Parts

Want a twist on the classic? Zigzag parts bring instant fun without extra time. Chunkier twists mean faster styling and easier take-down—perfect for squirmy kids with short patience (so… all of them).
Why It Works
- Zigzag parts hide frizz as the style ages.
- Chunky twists create volume and bounce—great for thick or medium-density hair.
- It’s quick. You can finish in 30–45 minutes once you get the hang of it.
Use a tail comb to draw subtle zigzags instead of straight lines, then create medium to large sections. Twist with a cream-based styler for a soft, fluffy finish. Add a few accent clips or cuffs to spice it up.
Pro Moves
- Keep even tension so each twist looks uniform.
- Don’t overload product—chunky twists can feel heavy if you go ham.
- Use silicone-free creams if you want easy washout.
Use this for picture day, weekend trips, or when you want a playful look that still protects the ends. It screams “effortless but intentional.”
3. Flat Twists In The Front, Twists In The Back

This combo style gives you the best of both worlds: sleek, protective flat twists at the front and classic two strand twists in the back. It keeps hair out of the face (hello, recess) while still letting curls move.
How To Do It
- Create 4–6 front-to-crown flat twists along the hairline.
- Twist the back in medium sections for easy maintenance.
- Secure ends with elastics if needed, or coil them for a bead-free finish.
Part on a slight curve for softness and comfort. Use gel only at the base for a neat look—don’t gel the whole strand unless you want a super-defined, firmer finish.
Maintenance
- Refresh the front with a spritz of aloe water and a touch of gel midweek.
- Wrap with a satin scarf at night to keep edges smooth.
- Oil the scalp only if dry—overdoing it can cause buildup.
Reach for this when you need a durable, face-framing style for school, sports, or dance class. It’s practical, sleek, and seriously cute.
4. Half-Up Pony Twists With Colorful Elastics

Half-up styles win every time because they keep hair controlled without losing movement. Add elastics or mini barrettes and you get instant kid-approved flair. It’s also a great way to stretch styles between wash days.
Step-By-Step
- Part from ear to ear and clip the top half up.
- Twist the bottom in medium sections for quick styling.
- Gather the top half into a puff or pony, then create 6–10 twists from the ponytail.
- Add colorful elastics along the twist length or at the ends.
Want extra fun? Thread through a few bright beads at the end of the top twists only. It keeps weight light but adds personality.
Keep It Comfy
- Don’t pull the pony too tight—no tension bumps.
- Use snag-free elastics and change them every few days.
- Slick flyaways with a small amount of edge control or mousse.
Use this for parties, playdates, or any day your kid wants to feel extra. FYI, it’s a great vacation style too because it photographs beautifully.
5. Twisted Pigtails With Accent Corners

Pigtails, but make them stylish. This look combines two strand twists with small accent parts near the temples or nape for a polished finish. It’s playful, symmetrical, and ridiculously photogenic.
Build The Look
- Create a clean center part from forehead to nape.
- On each side, part 2–3 small sections near the hairline and twist them toward the pigtail base.
- Gather each side into a low or high pigtail, then twist the ponytail lengths into medium twists.
- Add bows, clips, or cuffs to the base for extra charm.
Keep the accent sections small so they lay flat and don’t unravel. Use a soft-hold gel at the roots and a cream on the lengths for shine and flexibility.
Quick Wins
- Secure ends with coilless bands to prevent snagging.
- Switch between high and low pigtails to reduce tension spots.
- Refresh with a hydrating mist every other day.
Perfect for younger kids and busy mornings. It holds up at the playground and still looks neat for dinner with the grandparents—IMO, that’s a win.
6. Crisscross Rubber Band Twists
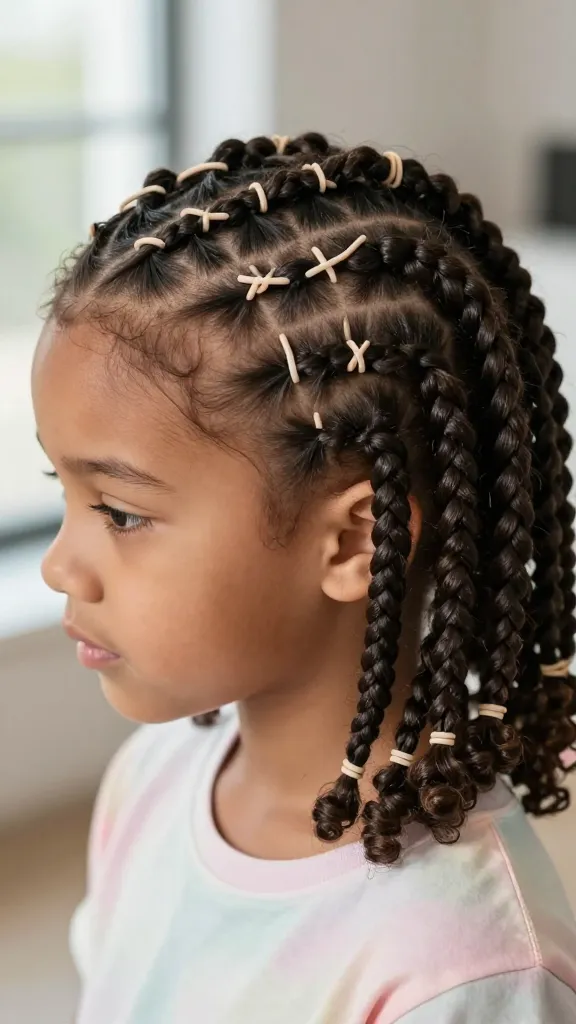
When you want “wow” without spending all day, crisscross rubber bands deliver. You’ll create a fun lattice pattern at the front, then finish with two strand twists. It’s trendy, protective, and surprisingly quick once you learn the pattern.
How To Map It Out
- Section the front into 6–10 small squares.
- Use gentle rubber bands (lightly oiled) on each square.
- Crisscross adjacent sections and band them into the next row to form the lattice.
- Twist the lengths of each section and the rest of the hair in medium twists.
Keep tension light and don’t leave rubber bands in for more than a week. A dab of oil on each band prevents snagging during take-down—trust me, your future self will thank you.
Pro Care
- Apply a leave-in and a light gel only at the base to avoid flaking.
- Cover with a satin bonnet at bedtime to preserve the pattern.
- Swap the front bands midweek if they look fuzzy.
Use this for birthdays, school events, or anytime your kid wants extra sparkle. It’s protective with a little edge—seriously, it turns heads.
Universal Twist Care: Quick Reference
- Prep with cleanse + deep condition every 1–2 weeks.
- Layer products: leave-in → cream → gel (optional) → oil on ends.
- Night routine: satin bonnet or pillowcase, and a light mist every other night.
- Scalp love: massage gently; avoid heavy oils that cause buildup.
- Take-down: coat fingers with oil, unravel slowly from ends upward.
Choosing The Right Products
- Fine hair: lightweight leave-in, foam mousse, tiny bit of oil.
- Medium hair: creamy leave-in, twisting cream, light gel for hold.
- Coarse or high-density hair: rich cream, butter on ends, gel only at roots for neatness.
Ready to twist like a pro? These six styles keep your kid’s hair protected, moisturized, and adorable with minimal drama. Pick one for the week, rotate for variety, and enjoy those extra minutes back in your morning routine. Your coffee will thank you.


