Let’s face it: tiny spooky nails can steal the show as hard as a full moon. Here are five bite-sized ideas that punch above their length, plus quick tips to nail the look (pun intended).
1. Tiny Bloody Mess: Subtle Splatters on a Pale Canvas

This one is the perfect mix of creepy and chic. A pale base makes the tiny red splatters look like a chilling crime scene you actually want to stare at. It’s simple, effective, and totally on-brand for Halloween.
Why it rocks
Short nails? No problem. A few deliberate droplets can create a high-impact horror vibe without needing long tips or scary precision.
How to do it
- Base: a sheer pink or ghostly white to keep the look crisp
- Technique: dab a thin brush with red polish and place 3-5 tiny droplets near the tip
- Top coat: a glossy seal that makes the droplets look wet
FYI, keep the splatters asymmetrical for a more authentic, messy vibe. This is the kind of manicure that looks effortlessly scary in photos.
2. Graveyard Gaze: Mini Tombstones on Matte Black
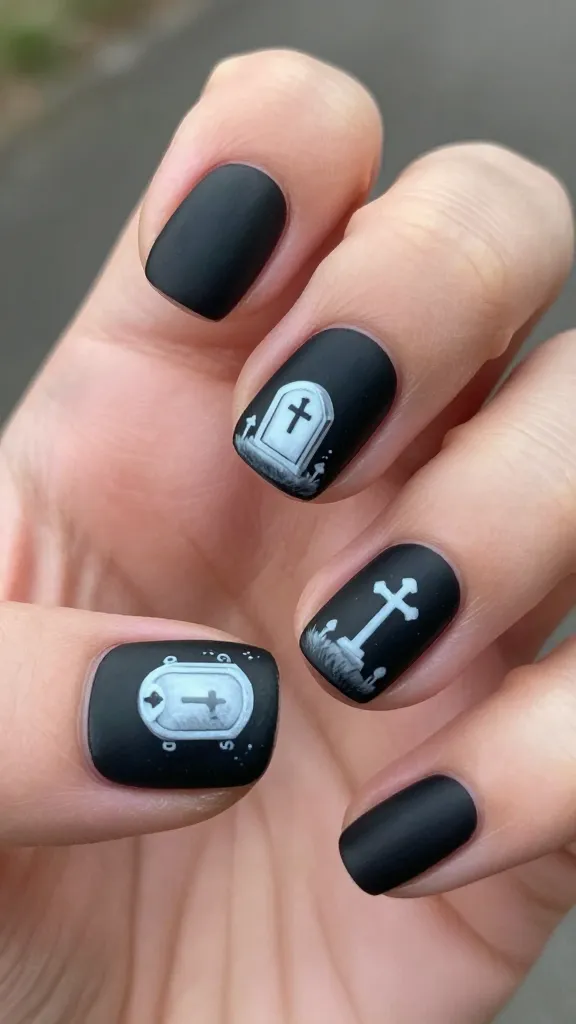
Install a tiny cemetery on a nail—it’s creepy, adorable, and surprisingly easy to pull off. Matte black nails give the tombstones a stark, eerie contrast that screams Halloween without going full horror movie villain.
Why it rocks
Short nails become a canvas for crisp silhouettes. The matte finish adds a goth edge that reads well in daylight and moonlight alike.
How to do it
- Base: matte black polish on all nails
- Accent nails: white or light gray for tombstone shapes
- Details: tiny crosses, numbers, or carved lines with a fine brush
These graves are small, but the vibe is eternal. Use a steady hand, and you’ll be ghost-approved in seconds.
3. Ghostly Tips: White Wisp Tips with a Hint of Glow
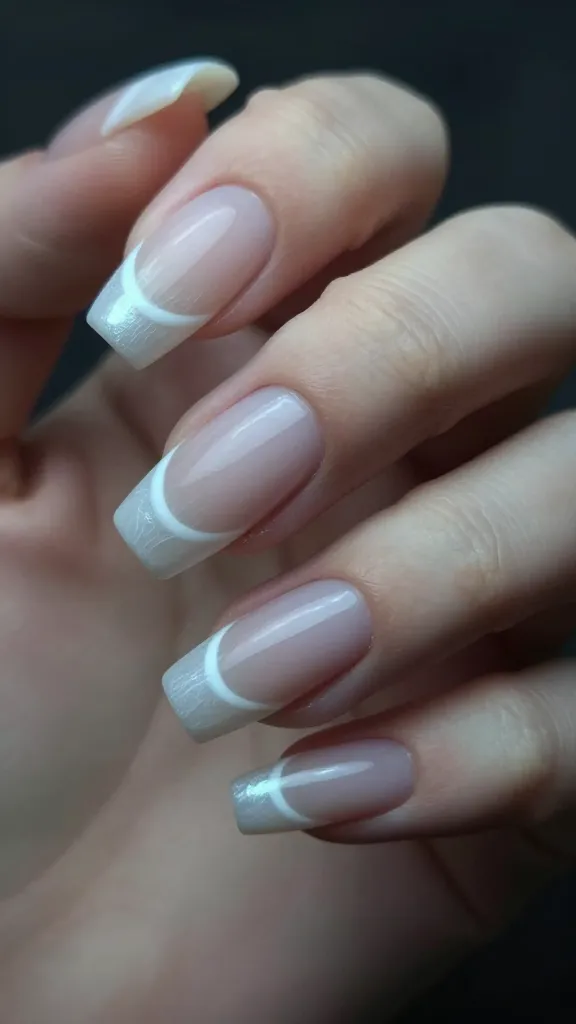
Less is more, especially when you want a spooky-chic look that reads as haunted but elegant. Ghostly tips give you an ethereal feel that glows softly under dim lights.
Why it rocks
Minimal design, maximum impact. It works on short nails and pairs with any outfit—from a flannel hoodie to a sizzling party dress.
How to do it
- Base: sheer nude or pale pink to keep it translucent
- Tip design: white semi-circles or crescent shapes on the free edge
- Optional: a soft top coat with a touch of iridescent shimmer for that otherworldly glow
Trust me, this look is incredibly versatile for day-to-night Halloween activities.
4. Wicked Witchy Fangs: Tiny Fang-Accent Nails
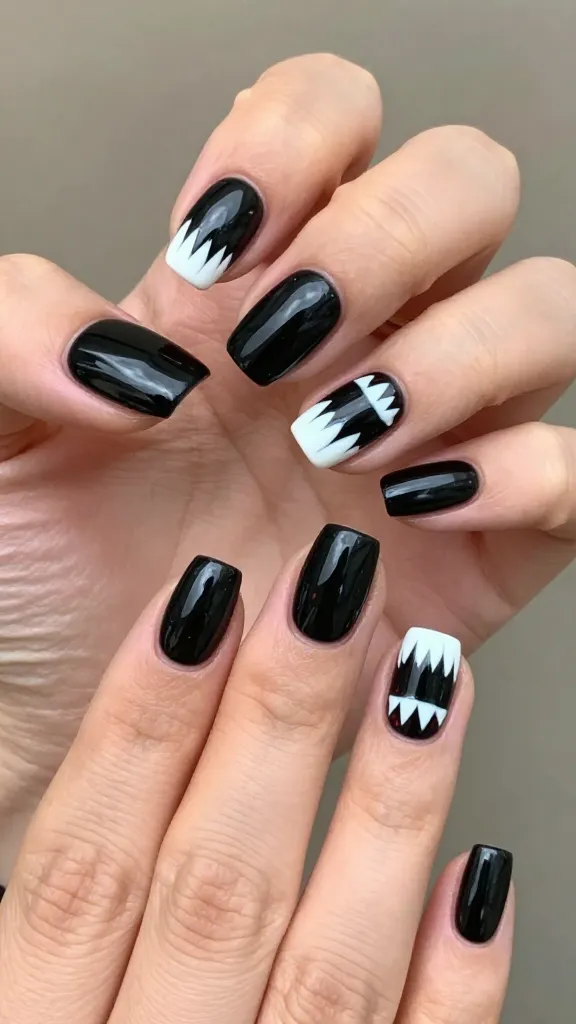
Fangs aren’t just for coffee mugs and memes—they can be legit nail art. A crisp black base with delicate fang accents adds a playful menace without going overboard.
Why it rocks
Short nails keep the design readable and cute instead of scary. It’s clever, it’s cute, and it’s definitely conversation-starting.
How to do it
- Base: deep black or charcoal polish
- Accent: white fang shapes on one or two nails, aligned along the tip
- Detail: tiny red dot or negative-space gaps to mimic a tooth
Finish with a sturdy top coat so your fangs stay sharp through trick-or-treat chaos.
5. Pumpkin Patch Minis: Mini Jack-o’-Lantern Faces

Small, sweet, and a touch goofy—this is the verdict on carved pumpkins without the mess. A tiny orange accent nail with a miniature jack-o’-lantern face feels festive and fun.
Why it rocks
Seasonal without being kitschy, this design works great as an accent feature on one nail or spread across a couple for balance.
How to do it
- Base: neutral nude or pale peach to let the orange pop
- Face details: black polish for eyes, nose, and mouth; keep lines clean and tiny
- Optional: add a touch of green at the cuticle to mimic a pumpkin stem
End with a glossy top coat to seal those squiggly little smiles in place, and you’re pumpkin-ready all season long.
These five ideas are designed to be quick, low-fuss, and totally wearable for short nails. FYI, you can mix and match elements from each to create a custom set that fits your mood and costume. Seriously, you don’t need long nails to pull off high-impact horror—just a steady hand and a little imagination.
If you’re thinking about where to start, pick one main motif (splatters, tombstones, ghosts, fangs, pumpkins) and let the others complement it with small accents. The key is contrast: light bases with dark accents, or dark bases with bright, tiny details. Try to keep a cohesive color story so your nails look intentional instead of chaotic.
Want extra longevity? Use a gel top coat or a long-wear formula, and cap each nail to prevent chipping after you dive into all the Halloween candy. And don’t forget to cleanse your nails before starting—oil-free surfaces help the polish bite down and last longer. Trust me, you’ll thank me when you still have decent nails after your third sugar rush.
Now go pick your favorite vibe, raid your polish stash, and get ready to shock and delight with nails that scream Halloween in the best possible way. You’ve got this, and your fingertips are about to become the star of every costume pic.