Want nails that scream spooky chic and spark conversation? These Freddy-inspired ideas are playfully eerie, easy to DIY, and totally wearable for costumes or a fierce Halloween look.
1. Nightmare Night Guiding Glow: Glowing Freddys
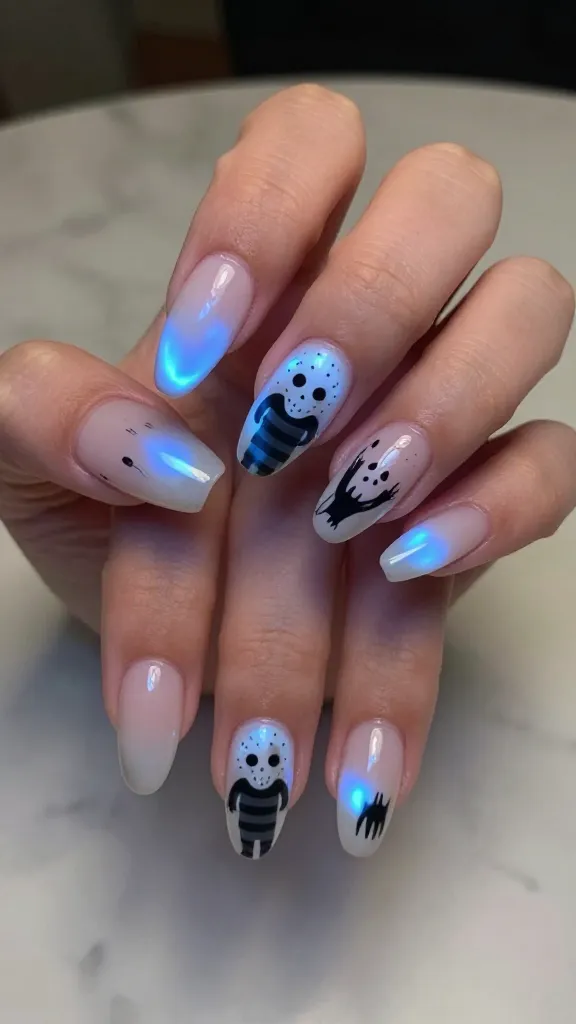
Kick things off with a glow-in-the-dark homage that’s equal parts eerie and adorable. This design uses simple layering to create a mini Freddy silhouette on each nail, then charges under a UV light for after-dark drama.
Key Points
- Base: sheer pink or pale nude for a ghostly canvas
- Accent: thin black lines to sketch the mask and glove details
- Glow: a phosphorescent top coat for that haunting afterglow
FYI, you’ll want a clean, steady hand or a fine brush to mimic the iconic mask. The glow makes the design pop in dim rooms, so it’s perfect for Halloween parties or horror movie marathons. Trust me, eyes will glaze over with envy at the glow.
Best for: a bold intro to the set; works on all nail shapes.
2. The Glove Graffiti: Silhouette and Stripes

Turn your nails into a tiny, wearable mural of Freddy’s clawed glove. A crisp black silhouette against a blood-red background feels instantly iconic and a little rebellious.
What to Try
- Base: bold blood red or deep crimson
- Claw: metallic gold or gunmetal for the fingertips
- Details: thin black lines for the glove stripes and bandage wrapping
Keep lines clean with a fine liner brush or nail art pen. This design is high-impact but surprisingly forgiving—small wobbles just add character. If you’re short on time, a single accent nail with the glove motif can still read Freddy enough to get the point across.
Best for: a dramatic statement nail set, ideal for photos or a party run.
3. Freddy Face Reimagined: Mini Mask Mani

Go directly to the face with a mini Freddy mask on one or two nails. This version simplifies the look into a few bold strokes—enough to scream Freddy without looking messy.
Design Breakdown
- Base: pale skin tone or soft beige for contrast
- Mask: red shapes for the cheeks and signature scar lines
- Eyes: small black dots or mini slits for that sinister stare
Pro tip: sketch the mask first with a light pencil-like gel liner, then fill in with polish. It saves you from one giant smudge-hour and keeps the expression on point. Seriously, small details make a big impact here.
Best for: close-up shots and those who love a face-forward look.
4. Slashed Night Sky: Gradient Blood Moon

Combine a moody gradient with Freddy’s theme for a more atmospheric take. A dark gradient background with a red slash and claw tips creates a haunting, cinematic vibe.
How to Build It
- Base: gradient from black to deep red
- Moon slash: thin white arc to mimic a slash across the nail
- Claw tips: metallic accents on the far edge
This look is more about mood than strict accuracy, and that’s the beauty of it. The gradient blends warm and cool tones, giving you a versatile manicure that still nods to Freddy. IMO, it’s the most wearable for non-advanced nail artists.
Best for: party nights and photos with dramatic lighting, where gradients shine.
5. Classic Crooked Smile: Minimalist Freddy

Sometimes less is more. A minimalist take uses negative space and a single, bold Freddy motif to keep things chic and spooky.
Minimal Elements
- Base: nude or pale pink to emphasize negative space
- Claw accent: one nail with a stark red “scar” line
- Accent nail: a tiny Freddy grin painted in black on a clear spot
Minimalist doesn’t mean boring. It means you’re keeping it classy while nodding to the horror universe. It’s quick, cute, and surprisingly versatile with outfits. Seriously, it pairs with almost any Halloween ensemble.
Best for: a refined Krueger nod that still feels festive and fun.
Ready to pick a favorite? Each design leans into Freddy’s iconic vibe but keeps things approachable enough for a DIY weekend. FYI, practice your lines with a steady hand on a nail wheel before committing to your hands. And if you mess up, flip the script: a tiny blood-red accent can cover a mistake and still look intentional.
Conclusion: Now you’ve got five killer Freddy-inspired looks to rotate through October. Grab a few basics, some brushes, and your favorite top coats, and you’re set for a nail art Halloween season that slays. Trust me, your friends will be asking where you got them (and you’ll brag about the DIY hustle).