Get ready to elevate your nail game with the trending aura nails look!
The aura nails trend has taken the beauty world by storm, and you can now create this stunning look in the comfort of your own home.
In this step-by-step guide, we’ll walk you through the process of achieving the viral aura nails look. With this DIY nail art tutorial, you’ll learn how to create a mesmerizing, multi-dimensional effect on your nails.
Key Takeaways
- Learn the basics of aura nails and how to achieve the look at home
- Discover the essential tools and materials needed for the tutorial
- Follow a step-by-step guide to create the viral aura nails look
- Tips and tricks for customizing the look to suit your personal style
- Common mistakes to avoid when attempting the aura nails trend
What Are Aura Nails? Understanding the Viral Trend
If you’ve been scrolling through your social media feeds, you’ve probably come across the mesmerizing aura nail designs that have everyone talking. Aura nails have become a viral sensation, captivating beauty enthusiasts with their unique, ethereal effect.
The Origin of Aura Nails
The concept of aura nails originated from the desire to create a nail art effect that mimics the aura or energy field around a person. This trend is closely related to the spiritual and mystical movements that have been gaining popularity in recent years. The technique involves blending colors in a way that creates a soft, gradient-like effect around the nail.
Why Aura Nails Have Taken Social Media by Storm
Aura nails have taken social media by storm due to their visually striking appearance and the creative freedom they offer. The unique, multi-dimensional effect of aura nails makes them perfect for Instagram-worthy nail art. Here are some reasons why they’ve become so popular:
- Unique aesthetic appeal
- Creative expression and customization
- Influence from social media and celebrity culture
The Science Behind the Ethereal Effect
The ethereal effect in aura nails is achieved through a specialized technique involving color blending and layering. By using a sponge or other tools to blend colors, nail artists can create a seamless transition between shades, resulting in a soft, aura-like effect. The key to achieving this effect lies in the careful selection of colors and the application technique.
Aura nail design has become a viral nail trend due to its captivating visual appeal and the creative possibilities it offers. As with any trend, understanding the technique and science behind it can help enthusiasts create their own stunning versions at home.
Essential Supplies for Your Aura Nails
To achieve the mesmerizing aura nail effect, you’ll need to gather a few essential supplies. Having the right tools and products is crucial for a successful at-home nail tutorial.
Base Products and Tools
Start by preparing your nail care basics. You’ll need a nail polish remover to clean your nails, a nail file to shape them, and a base coat to protect your nails and promote polish adhesion.
Color Selection for the Perfect Aura Effect
The color selection is vital for achieving the desired aura effect. Choose 2-3 nail polish colors that blend well together. For a more pronounced aura effect, consider using contrasting colors. Some popular combinations include pastel shades, neon colors, or metallic polishes.
Regular Polish vs. Gel Polish Options
Decide whether you prefer using regular nail polish or gel polish for your aura nails. Regular polish is easier to apply and remove, while gel polish provides a longer-lasting finish. Consider your personal preference and the desired outcome when making your choice.
Optional Enhancements and Accessories
To take your aura nails to the next level, consider adding some optional enhancements. These can include glitter polish, nail art brushes, or nail stickers. Experiment with different accessories to create unique and personalized designs.
By gathering these essential supplies, you’ll be well-prepared to create stunning aura nails at home. Remember to choose products that suit your nail type and personal style.
Preparing Your Nails for the Aura Effect
Before diving into the aura nails tutorial, it’s essential to prepare your nails properly. A well-prepared nail surface is crucial for achieving a flawless aura effect.
Proper Nail Cleaning and Shaping
Start by cleaning your nails thoroughly to remove any oils or residue. Use a nail cleanser or acetone to wipe down each nail. Then, shape your nails to your desired form, making sure to smooth out any ridges or imperfections.
Base Coat Application Techniques
Apply a base coat to protect your nails and create a smooth surface for the aura effect. Choose a base coat that suits your nail type, and apply a thin, even layer. Let it dry completely before moving on to the next step.
Creating the Perfect Canvas
To achieve a seamless aura effect, your nails need to be free of imperfections. Make sure to buff your nails gently to create a smooth surface. This will help the colors blend evenly and prevent any streaks or marks.
By following these steps, you’ll be able to create a beautiful, professional-looking aura nail design at home. Proper nail preparation is key to a successful DIY nail art project.
Step-by-Step Aura Nails Tutorial: Basic Technique
Creating aura nails at home is easier than you think with this simple, step-by-step guide. The aura nail effect has taken the beauty world by storm, and with the right technique, you can achieve this stunning look in the comfort of your own home.
Creating the Base Layer
The first step in creating aura nails is to prepare your nails with a base layer. Apply a clear base coat to protect your nails and promote even polish adhesion. Let it dry completely before moving on to the next step.
Applying the Aura Effect with a Sponge
To achieve the signature aura effect, you’ll need to use a makeup sponge. Dab a small amount of polish onto the sponge, making sure not to overload it. Gently dab the sponge onto your nail, starting from the center and working your way outwards. This technique helps create a soft, gradient effect.
Blending for a Seamless Look
Blending is crucial for achieving a seamless aura effect. Use a clean makeup sponge or a blending brush to softly merge the colors on your nail. Be gentle, as rough movements can smudge the polish.
Sealing and Finishing Your Design
Once you’re happy with your aura nail design, it’s time to seal it with a top coat. Apply a thin layer of top coat to protect your design and add shine. Make sure to cover the entire nail surface to prevent chipping.
With these simple steps, you can create beautiful aura nails at home. Practice makes perfect, so don’t be discouraged if it takes a few tries to get the hang of it.
Mastering the Gradient Technique for Aura Nails
The gradient technique is a game-changer for creating stunning aura nails at home. This method allows for a seamless transition between colors, creating an ethereal effect that’s characteristic of the aura nail trend.
Using a Makeup Sponge for Blending
A makeup sponge is an essential tool for achieving the gradient effect in aura nails. To use it effectively, dab the sponge gently onto the nail surface after applying polish. This technique helps in blending the colors and creating a soft, diffused look.
For optimal results, choose a high-quality makeup sponge that’s designed for blending. The texture of the sponge plays a crucial role in how well the colors merge on your nails.
Creating Smooth Color Transitions
Smooth color transitions are the hallmark of a well-executed gradient nail technique. To achieve this, it’s essential to work with wet polish and blend the colors quickly before they dry.
Experimenting with different color combinations can help you find the perfect palette for your aura nails. Soft pastels, neon hues, and metallic shades can all be used to create unique gradient effects.
| Color Combination | Effect | Occasion |
|---|---|---|
| Pastel Pink and Purple | Soft, Romantic | Everyday Wear |
| Neon Orange and Yellow | Vibrant, Bold | Summer or Festival |
| Metallic Silver and Blue | Glittering, Futuristic | Party or Special Event |
Achieving the Perfect Diffused Glow
The diffused glow is what gives aura nails their signature ethereal quality. To achieve this, focus on blending the colors at the edges and ensuring there’s a smooth transition between shades.
Tip: Using a light touch and working in thin layers can help prevent the polish from pooling or becoming too thick, which can detract from the diffused glow.
Troubleshooting Common Gradient Issues
Common issues with gradient nails include uneven color distribution, streaks, and polish pooling at the cuticles. To troubleshoot these issues, adjust your blending technique, and ensure your nail surface is clean and dry before applying polish.
Patience is key when mastering the gradient technique. Don’t be discouraged by initial attempts; with practice, you’ll achieve the desired aura effect.
5 Popular Aura Nail Color Combinations to Try
Aura nails have taken the beauty world by storm, and one of the most exciting aspects is the endless array of color combinations you can try. The right palette can elevate your nail art, making it truly unique and eye-catching. Here are five popular aura nail color combinations to inspire your next manicure.
Celestial Blue and Purple Aura
A celestial blue and purple aura nail design is perfect for those who love a mystical, ethereal look. To achieve this, start with a light blue base coat, then use a sponge to blend purple and blue polish, creating a gradient effect that gives your nails a cosmic glow.

Sunset Orange and Pink Aura
For a warm, vibrant look, try a sunset orange and pink aura nail design. Begin with a neutral base, then apply orange and pink polish with a makeup sponge, blending the colors for a seamless transition that captures the essence of a sunset.
Ethereal Green and Blue Aura
An ethereal green and blue aura nail combination is ideal for nature lovers. Start with a pale green base, then use a sponge to apply blue and green polish, creating a soft, blended effect that evokes the tranquility of a forest.
Romantic Pink and White Aura
A romantic pink and white aura nail design is perfect for a classic, elegant look. Apply a white base coat, then use a sponge to gently blend pink polish, creating a soft, romantic aura around your nails.
Dramatic Black and Red Aura
For a bold, dramatic look, try a black and red aura nail combination. Start with a black base, then use a sponge to apply red polish, creating a gradient effect that adds depth and intensity to your nail art.
| Color Combination | Description | Best For |
|---|---|---|
| Celestial Blue and Purple | Mystical, ethereal look | Those who love cosmic or mystical themes |
| Sunset Orange and Pink | Warm, vibrant look | Summer or tropical-themed nail art |
| Ethereal Green and Blue | Soft, natural look | Nature lovers or those seeking a calming effect |
| Romantic Pink and White | Classic, elegant look | Weddings, formal events, or everyday elegance |
| Dramatic Black and Red | Bold, dramatic look | Those who want to make a statement with their nail art |
Experimenting with different aura nail design color combinations is a fun way to personalize your nail art and stay on top of the latest beauty trends. Whether you prefer soft pastels or bold brights, there’s an aura nail design out there for everyone.
Advanced Aura Nail Designs and Variations
Push the boundaries of nail art with advanced aura techniques. As you become more comfortable with the basics of aura nails, you can start experimenting with new designs and variations to take your nail art to the next level.
Adding Glitter and Shimmer Elements
One way to enhance your aura nail design is by incorporating glitter and shimmer elements. You can use glitter polish or loose glitter on top of your aura effect for added sparkle. Glitter polishes come in various sizes and colors, allowing you to customize the level of sparkle you want to achieve.
Incorporating Nail Art and Embellishments
Combining aura nails with other nail art techniques can create truly unique designs. Consider adding nail stickers, rhinestones, or hand-painted designs to your aura nails for extra flair. This fusion of techniques can help you create one-of-a-kind nail art that stands out.
Creating Multi-Dimensional Aura Effects
To add depth to your aura nails, you can experiment with layering different colors and finishes. For instance, applying a holographic topcoat over your aura design can give it a multi-dimensional appearance. Layering techniques can help achieve a more complex and interesting look.
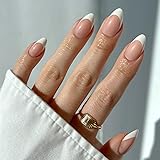
French Tip Aura Variation
For a twist on the classic French tip, you can incorporate aura effects into this timeless design. By blending the aura colors into the tip of the nail, you create a soft, gradient French tip that adds a modern touch to a traditional look.
By incorporating these advanced techniques into your nail art repertoire, you can continue to evolve your aura nail designs and keep your look fresh and exciting.
Gel vs. Regular Polish Aura Nails Techniques
To achieve the perfect aura effect, understanding the differences between gel and regular polish is essential. Both methods have their unique characteristics that can either enhance or detract from the overall aura nail design.
Creating Aura Nails with Regular Polish
Using regular polish for aura nails involves a more traditional nail painting technique. It requires careful application and blending to achieve the desired aura effect. Regular polish dries quickly, but it may not last as long as gel polish.
Gel Polish Aura Nail Method
Gel polish, on the other hand, involves applying polish that is cured under a UV or LED light. This method provides a longer-lasting finish and can be more durable than regular polish. The gel polish aura nail method requires a bit more preparation and the right equipment.
Pros and Cons of Each Technique
| Technique | Pros | Cons |
|---|---|---|
| Regular Polish | Easy to apply and remove, dries quickly | Less durable, may chip faster |
| Gel Polish | Long-lasting, durable finish | Requires UV/LED light, harder to remove |
Drying and Curing Tips
For regular polish, using a quick-dry topcoat can help speed up the drying process. For gel polish, ensuring that each layer is properly cured under the light is crucial.

Understanding these techniques and their implications can help you decide which method is best for your aura nail design. Whether you choose gel or regular polish, the key to a successful aura nail is in the application and blending.
Troubleshooting Common Aura Nail Problems
The process of creating Aura Nails, while rewarding, isn’t without its troubleshooting needs. Even with careful preparation and execution, issues can arise that affect the final result.
Fixing Blending Issues
One common problem is uneven blending, which can lead to harsh lines or patchy color distribution. To fix this, try adjusting the amount of polish on your sponge or using a different blending technique. Experimenting with various sponge densities can also help achieve a smoother transition between colors.
Dealing with Smudges and Mistakes
Smudges and mistakes are inevitable, but they can often be corrected. For smudges, gently clean the area with a cotton swab dipped in nail polish remover. If a mistake is caught early, it can usually be carefully wiped away without ruining the entire design.
Preventing Bubbles and Streaks
Bubbles and streaks can detract from the Aura Nail effect. To prevent these issues, ensure your base coat is fully dry before applying the Aura effect. Using a high-quality polish that is not too thick or too thin can also help minimize these problems.
Salvaging a Failed Aura Attempt
If your Aura Nail attempt doesn’t turn out as expected, don’t be discouraged. Sometimes, a failed design can be transformed into something new and interesting with a bit of creativity. Consider adding additional nail art elements or turning the nail into a feature nail with a different design.
Conclusion: Show Off Your Beautiful Aura Nails
Now that you’ve mastered the aura nails tutorial, it’s time to show off your nail art. With the techniques and tips learned from this guide, you can create stunning aura effects that will elevate your nail game. Experiment with different color combinations and variations to make your aura nails truly unique.
Whether you’re heading to a special occasion or just want to add some flair to your everyday look, aura nails are sure to turn heads. Don’t be afraid to get creative and try out new designs. Share your aura nail art on social media and inspire others to try this viral trend.
With practice and patience, you’ll become a pro at creating beautiful aura nails. So, go ahead and show off your nail art – we can’t wait to see what you create!
FAQ
What is the best way to prepare my nails for an aura nail design?
To prepare your nails, start by cleaning and shaping them. Apply a base coat to create a smooth canvas, ensuring your aura nail design adheres well and lasts longer.
Can I use regular nail polish for aura nails, or do I need gel polish?
You can use either regular nail polish or gel polish for aura nails. Regular polish is easier to remove, while gel polish provides a longer-lasting finish. The choice depends on your personal preference and the desired durability of your nail design.
How do I achieve a seamless blend in my aura nail design?
To achieve a seamless blend, use a makeup sponge to gently dab the colors onto your nails. This technique helps to merge the colors smoothly, creating the characteristic aura effect. Practice makes perfect, so don’t be discouraged if it takes a few attempts to get it right.
What are some common mistakes to avoid when creating aura nails?
Common mistakes include not preparing the nail surface properly, using too much polish on the sponge, and not blending the colors sufficiently. To avoid these issues, ensure your nails are clean and dry, use a light touch with the sponge, and blend the colors gently until you achieve the desired effect.
How can I make my aura nail design last longer?
To extend the life of your aura nail design, apply a top coat to seal the polish and prevent chipping. Avoid using your nails as tools, and wear gloves when doing dishes or engaging in other activities that can cause wear and tear.
Can I incorporate nail art or embellishments into my aura nail design?
Yes, you can add nail art or embellishments to enhance your aura nail design. Consider adding glitter, rhinestones, or other decorative elements once your aura effect is complete and sealed with a top coat.
How do I remove aura nail polish if I make a mistake or want to change my design?
To remove aura nail polish, use a nail polish remover. For gel polish, you’ll need a gel polish remover. Soak a cotton pad with the remover, place it on your nail, and wrap with foil. Let it sit for a few minutes before gently scraping off the polish.
Glamnetic Press On Nails - MaDamn | French Tip Nails, UV Finish Short Pointed Almond Shape, Salon Quality Semi-Transparent Nails in 12 Sizes - 24 Nail Kit with Glue
$15.99 (as of December 11, 2025 09:38 GMT +00:00 - More infoProduct prices and availability are accurate as of the date/time indicated and are subject to change. Any price and availability information displayed on [relevant Amazon Site(s), as applicable] at the time of purchase will apply to the purchase of this product.)