Introduction: Because Ripping Them Off Isn’t the Answer (Trust Me)
Okay, so your Gel X nails have started growing out, and they’re snagging on everything from your sweater to your soul. You know it’s time for them to come off — but a trip to the salon just isn’t in the cards right now. (Whether it’s time, budget, or just not wanting to make small talk with your nail tech — we’ve all been there.)
But here’s the thing: removing Gel X nails the wrong way can seriously mess up your natural nails. And no one wants that brittle, paper-thin aftermath. Been there. Regret it. Learned my lesson. 😅
The good news? You can remove them at home — safely, easily, and without turning your nails into a sad story. So grab your nail kit (or raid your bathroom drawer), and let’s walk through exactly how to remove Gel X nails at home the right way.
What Exactly Are Gel X Nails? (Quick Recap Before We Start)
If you’re new to Gel X, here’s the quick tea: they’re basically soft gel extensions that are applied with a gel adhesive and then cured under a UV or LED light. Think of them as the perfect marriage between acrylic strength and gel flexibility.
They look natural, feel light, and can last for weeks. But because they’re bonded with gel, they don’t just peel off — at least not without taking your natural nail along for the ride (ouch).
So yeah, don’t even think about prying them off. Let’s do this the right way.
What You’ll Need: Your Gel X Removal Toolkit 🧰
Before we get started, let’s make sure you’ve got everything you need. You don’t need salon-grade tools — just the basics that you probably already own.
Here’s your checklist:
- Acetone (100% pure) – The MVP of nail removal.
- Cotton balls or pads – To soak the acetone.
- Aluminum foil – To wrap your nails (or nail clips if you’re fancy).
- Nail file (coarse and fine grit) – For filing down the top layer.
- Cuticle pusher or orangewood stick – To gently lift softened gel.
- Buffer block – To smooth out the surface afterward.
- Cuticle oil or hand cream – For aftercare (don’t skip this).
💬 Pro Tip: If you don’t have foil, use small plastic wrap pieces and secure them with hair ties. Improvisation = skill.

Step-by-Step: How to Remove Gel X Nails at Home Without Damage
Alright, friend — here’s where the magic happens. Follow these steps and your nails will thank you later.
Step 1: File the Top Coat Off
Grab your coarse nail file and start gently filing down the shiny top layer of your Gel X nails.
Why? Because that top coat acts like a barrier — and if you don’t file it off, the acetone can’t penetrate the gel properly.
What to do:
- Use medium pressure; you’re just removing shine, not your entire nail.
- Stop once the nails look matte and slightly rough.
💬 FYI: This step is crucial. Skip it, and you’ll be sitting there wondering why your nails won’t budge.
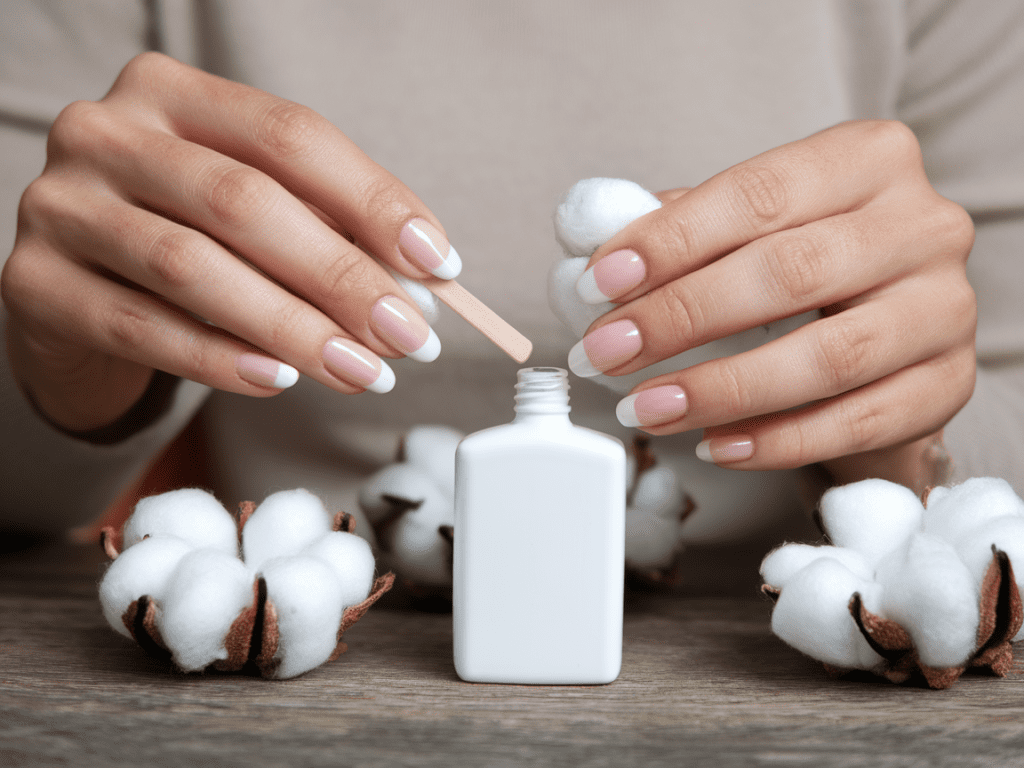
Step 2: Soak Cotton Balls in Acetone
Take your acetone-soaked cotton balls and place one on each nail. The goal here is to let the acetone break down the gel adhesive holding the extension.
Quick hack: Warm acetone works faster! Place your acetone bottle in a bowl of warm water for 2–3 minutes before soaking (not in the microwave, please — we’re removing nails, not starting fires). 🔥
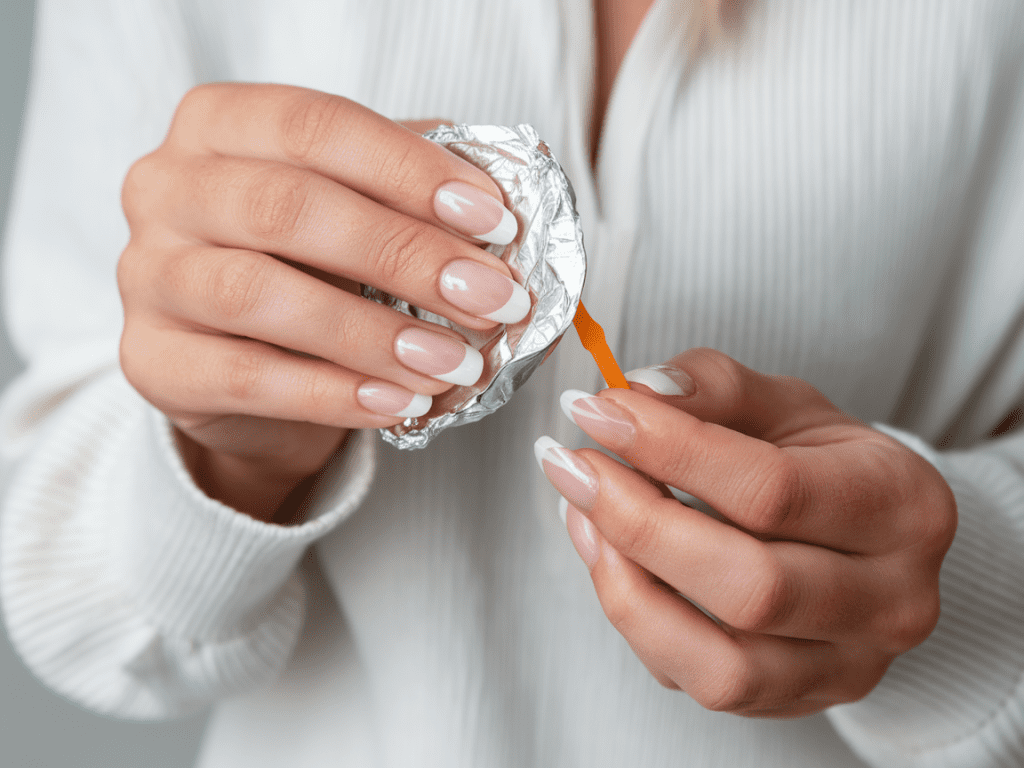
Step 3: Wrap Each Nail in Foil (Or Use Nail Clips)
Wrap each acetone-soaked nail with a piece of foil. It keeps the cotton in place and prevents the acetone from evaporating.
How long to wait:
- 20–30 minutes usually does the trick.
- If your nails are thicker or have layers of design, you may need closer to 40 minutes.
💬 Pro Tip: Set a timer, grab a snack, or binge an episode of your favorite show. You can’t rush the soak — patience is key.
Step 4: Gently Push Off the Softened Gel
After soaking, remove one foil wrap and test a nail. The gel should look soft, wrinkled, and slightly lifted.
Use your cuticle pusher or orangewood stick to gently push the softened gel off. And I mean gently. If it’s resisting, re-wrap that nail and give it 10 more minutes.
💬 Personal Take: The first time I did this, I got impatient and scraped too hard. Big mistake. My nails looked like they’d gone through a lawnmower. Don’t be me.
Step 5: Buff and Shape Your Natural Nails
Once all the gel is off, use your buffer block to smooth the surface. This removes leftover residue and evens out texture.
Then grab your fine-grit file and gently shape your nails — round, square, almond — whatever fits your vibe.
💬 Pro Tip: Be gentle here too. Your nails are slightly soft after acetone exposure, so avoid aggressive filing.
Step 6: Hydrate, Hydrate, Hydrate! 💧
Your nails and skin will feel dry after all that acetone. It’s completely normal — acetone is effective, but it’s also dehydrating.
Here’s how to bring your nails back to life:
- Massage cuticle oil into each nail bed.
- Follow with a rich hand cream or shea butter.
- If your nails feel brittle, apply a strengthening nail serum for a few days.
💬 Personal Take: I like to give my nails a “rest week” after removal — no polish, no gel, just TLC. They always thank me later with stronger growth.
Alternative Methods (If You’re Out of Foil or Just Hate the Mess)
Maybe you’re not into the whole “foil finger burrito” situation. Fair. Here are two other easy methods:
1. Acetone Bowl Method
- Pour acetone into a small bowl (preferably glass).
- Soak your fingertips for about 20 minutes.
- Use your cuticle pusher to remove the softened gel.
💬 FYI: This method works fast but can dry your skin more, so moisturize well after.
2. Steam-Off Method (Less Messy)
Some nail removal kits now come with steam-off machines that warm acetone vapors to dissolve gel — no soaking, no wrapping.
Pros:
- Less messy.
- Faster and gentler on skin.
Cons:
- Slightly pricier.
- Doesn’t always work as well for thick layers.
💬 Pro Tip: If you remove your Gel X nails often, investing in a steam-off kit might actually save you time and your sanity.
What NOT to Do When Removing Gel X Nails 🚫
Because sometimes, knowing what not to do is just as important as what you should do.
Avoid these rookie mistakes:
- ❌ Peeling or prying them off. You’ll take layers of your real nail with it. (Seriously — don’t.)
- ❌ Using too much force with your pusher. If it’s not soft, soak it longer.
- ❌ Skipping cuticle oil after removal. Dry nails crack. Moisturized nails thrive.
- ❌ Using nail polish remover instead of acetone. Regular remover won’t cut it here.
💬 FYI: I once peeled off a set after a bad day. The result? My natural nails were so weak, I couldn’t open a can of soda for a week. Don’t learn the hard way.
How Often Should You Remove or Replace Gel X Nails?
Here’s the deal — Gel X nails can last 3–4 weeks, but once you hit the four-week mark, it’s time to say goodbye.
Why?
- Overgrown nails put stress on the extension.
- Moisture and bacteria can sneak in underneath.
- The longer you wait, the harder removal becomes.
💬 Pro Tip: Always give your natural nails a break every few sets — even just a week or two — to let them breathe and recover.
Nail Care After Removal: Keep Them Strong and Healthy 💪
After removing your Gel X nails, it’s time for recovery mode.
Here’s your post-removal care routine:
- Moisturize daily. Oils like jojoba or vitamin E help nourish weak nails.
- Use a strengthening base coat. Helps prevent splitting or peeling.
- Avoid harsh chemicals. Use gloves for cleaning or washing dishes.
- Take a break from gels for 1–2 weeks. Let your nails rebuild their natural oils.
- Keep your nails short temporarily. This reduces breakage while they recover.
💬 Personal Take: When I follow this routine, my nails actually end up looking better after removal than before. It’s like they glow up post-rehab.
Quick Summary: The “No Damage” Gel X Removal Routine 📝
Here’s the entire process in a nutshell:
- File the top coat to break the seal.
- Soak cotton balls in acetone (warm it slightly for faster results).
- Wrap your nails in foil for 20–30 minutes.
- Gently push off softened gel — no scraping!
- Buff and shape your natural nails.
- Hydrate like crazy with oil and lotion.
Simple, safe, and stress-free — no tears, no broken nails, and no regrets.
Final Thoughts: You’ve Got This, DIY Nail Queen 👑
Removing Gel X nails at home might sound intimidating, but once you’ve done it properly once, it’s actually super satisfying. There’s something weirdly therapeutic about it — like you’re giving your hands a little spa moment (minus the salon bill).
💬 Personally? I find it kind of relaxing — it’s just me, my acetone wraps, and a Netflix binge. And when it’s done right, my nails look smooth, healthy, and ready for their next glow-up.
So go ahead — skip the salon this time. You’ve got all the tools, the knowledge, and the confidence to remove your Gel X nails at home safely and easily. Just promise me one thing: no peeling. Deal? 😉
12 Colors Nail Art Marker Pens Set, Nail Markers for Nail Art, Suitable for Nail Art, Nail Painting, And Artistic Decorations; Suitable for Both Children And Adults. (12 Colors)
$13.99 (as of December 11, 2025 09:38 GMT +00:00 - More infoProduct prices and availability are accurate as of the date/time indicated and are subject to change. Any price and availability information displayed on [relevant Amazon Site(s), as applicable] at the time of purchase will apply to the purchase of this product.)